Salted Caramel Sauce (That Sets Properly)
glossy, thick, and never grainy
Salted Caramel Sauce (That Sets Properly)
Ingredients
- 200g (1 cup) caster sugar
- 90g (6 tbsp) unsalted butter, cubed and at room temperature
- 120ml (1/2 cup) double cream, warmed
- 1 to 1.5 tsp flaky sea salt, to taste
- 1/2 tsp vanilla extract (optional)
Method
- Have the butter cubed and the cream warmed and ready beside the hob before you start.
- Spread the sugar in an even layer in a heavy-based pan and melt over a medium heat, swirling but not stirring, until it becomes a deep amber liquid.
- Add the butter all at once and whisk hard; it will bubble up furiously, so stand back.
- Once the butter is incorporated, slowly pour in the warm cream while whisking, then let it bubble for 1 minute.
- Remove from the heat and stir in the flaky salt and vanilla.
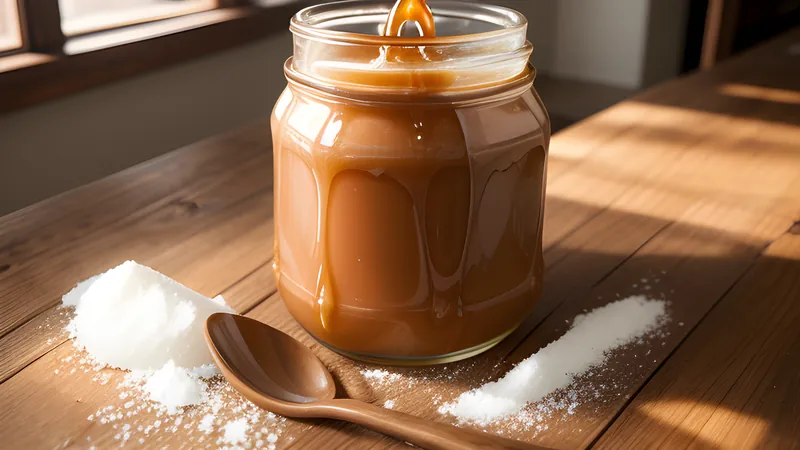
- Cool for a few minutes, then pour into a jar; it thickens as it cools and sets to a thick, scoopable sauce once chilled.
Everyone has a salted caramel sauce that let them down. Mine was a grainy, seized disaster I made for a dinner party years ago, served apologetically over ice cream with the texture of wet sand. I have made it dozens of times since, and somewhere along the way it stopped being frightening and started being the thing I make when I want to look like a much better cook than I am. This is the version that sets properly — thick and glossy and spoonable straight from the fridge — without ever turning grainy.
The whole thing takes about fifteen minutes and four ingredients. The catch is that caramel is unforgiving of hesitation, so the real recipe is half technique. Get the technique right and it is genuinely easy. Get it wrong and you get either burnt bitterness or a sandy mess. Let me save you both.
1 Why caramel goes wrong
There are two classic failures. The first is graininess, caused by sugar crystals seeding the whole batch and turning it from smooth liquid back into solid crystals. The second is a thin, watery sauce that never sets, usually because it was not cooked far enough or used too much cream.
The crystallisation problem is the one that catches people out, and the usual culprit is stirring. When you stir melting sugar, you fling crystals up the sides of the pan and back into the mix, and one stray crystal can chain-react the lot. So the rule for the melting stage is simple: swirl the pan, never stir it. Use a heavy-based pan so the heat is even, and resist the urge to poke at it.
2 The one clever twist: dry caramel, with the butter cold
Most home recipes start by dissolving the sugar in water. I have stopped doing this. The dry caramel method — melting the sugar straight in the pan with no water — is faster, gives a deeper, more toasty flavour, and removes the stage where water-based caramels are most likely to crystallise. The twist that makes it foolproof is adding cold, cubed butter the instant the sugar hits a deep amber, then whisking like you mean it. The butter drops the temperature and stops the sugar cooking further, while the vigorous whisking emulsifies everything into a smooth, glossy base. It bubbles up dramatically, so stand back, but it works every single time.
3 Making it, step by step
Get organised first, because once the sugar melts there is no time to go hunting for ingredients. Cube the butter, warm the cream gently (cold cream into hot caramel causes violent spluttering and can seize it), and have a whisk ready.
Spread the sugar in an even layer in your pan and set it over a medium heat. It will start to melt at the edges and turn to liquid. Swirl the pan occasionally to even it out, but do not stir. Watch the colour: it goes from clear to pale gold to a deep amber. You want a proper amber, the colour of an old penny — too pale and it tastes only of sugar; too dark and it turns bitter. This is the moment that matters.
The second it reaches that deep amber, tip in all the butter and whisk hard. It will foam and bubble furiously. Keep whisking until the butter is fully combined, then pour in the warm cream in a slow stream, whisking constantly. Let it bubble for a minute to thicken, then take it off the heat. Stir in the flaky salt and the vanilla if using.
4 Salt, and getting the set right
Add the salt at the end, off the heat, and taste as you go. Salted caramel lives or dies on this balance: too little and it is just caramel, too much and it is unpleasant. I start with a teaspoon of flaky sea salt and usually end up around one and a half. Flaky salt rather than fine, because it dissolves slowly and gives little bursts of saltiness.
The sauce will look quite loose and pourable while hot — that is correct. It thickens dramatically as it cools and sets to a thick, scoopable consistency in the fridge. If you want a thinner pouring sauce, gently warm it. It keeps in a sealed jar in the fridge for about two weeks, though it never lasts that long in my house.
5 What to do with a jar of it
Spoon it warm over vanilla ice cream, swirl it through brownie batter, sandwich it in cookies, drizzle it over apple cake, or stir a spoonful into hot milk for an indulgent nightcap. It also makes a quietly excellent gift in a small jar with a ribbon, which is to say it is the kind of thing that makes people think you have your life together. Once you have made it set properly once, you will never trust a grainy shop jar again.
Related Content