Roti Canai with a Proper Flaky Pull
The Malaysian griddle bread, stretched translucent, slapped and coiled into crisp, ragged layers
Contents
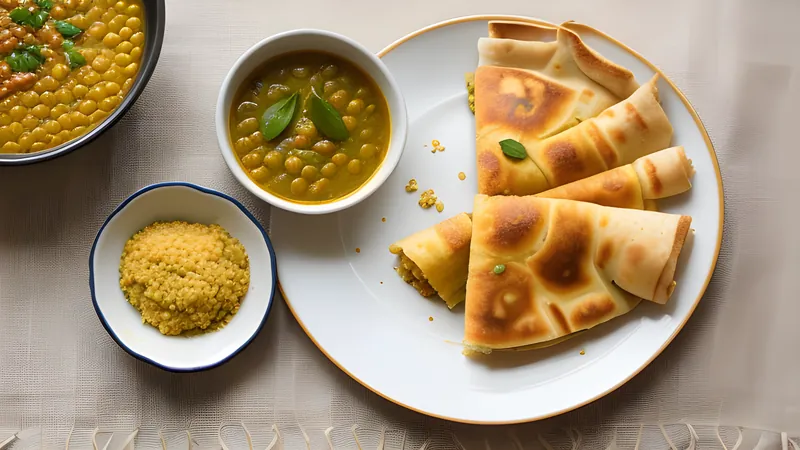
↓ Jump to recipeThere is a sound that tells you roti canai is done right, and it is not the sizzle of the griddle. It is the papery crackle when you clap the finished bread between your palms and the coiled layers shatter apart into ragged, buttery flakes. Malaysia’s most beloved griddle bread looks like a magic trick when the mamak-stall cooks make it, whipping a fist of dough into a sheet the size of a tablecloth with a single flick. You do not need that party piece at home. You need a soft, well-rested dough and a bit of nerve, and the layers will come.
Roti Canai with a Proper Flaky Pull
Ingredients
- 350g plain flour, plus extra for dusting
- 1 tsp fine salt
- 1 tbsp caster sugar
- 1 large egg
- 180ml water, lukewarm
- 2 tbsp sweetened condensed milk
- 3 tbsp softened ghee or unsalted butter, for the dough
- Extra soft ghee and neutral oil, for coating and resting (about 100g total)
- Flaky salt, to finish (optional)
Method
- Whisk the flour, salt and sugar in a large bowl. Beat the egg with the water and condensed milk, pour in, and add the 3 tbsp softened ghee.
- Bring together, then knead 10 minutes until very smooth, soft and slightly sticky. It should feel almost like a rich dough. Knead longer rather than shorter; the pull depends on strong gluten.
- Divide into 6 pieces and roll each into a tight ball. Sit them in a deep dish and pour over enough oil and soft ghee to coat them completely.
- Cover and rest at room temperature for at least 4 hours, ideally overnight in the fridge. This soak is what lets them stretch thin.
- Working on a lightly oiled worktop, flatten one ball with your palm, then push and stretch it outward from the centre until it is a large, near-transparent sheet. Tears are fine.
- Fold the far edge in, then loosely gather and ripple the sheet into a long ribbon, then coil the ribbon into a spiral like a snail shell. Tuck the end under. Rest coils 10 minutes.
- Press each coil gently into a round about 15cm across, keeping it loose, not rolled flat.
- Heat a flat griddle or heavy frying pan over medium-high with a little ghee. Cook each roti 2-3 minutes a side until deep golden with crisp, blistered layers.
- Off the heat, clap the hot roti between your palms to shatter and loosen the layers. Serve at once with dhal or curry.
From Chennai to the mamak stall
Roti canai arrived in Malaysia with South Indian, largely Tamil Muslim, migrants during the colonial period, a cousin of the Kerala parotta and the wider family of pulled, flaky Indian griddle breads. The name is usually traced either to canai, a Malay word meaning to roll or knead, or to the city of Chennai, and both stories point the same way: this is a bread that crossed the Bay of Bengal and put down deep roots. In Malaysia and Singapore it became the anchor of the mamak stall, the round-the-clock Indian-Muslim eatery where roti comes with a ladle of dhal and a couple of curries for dipping, at any hour a hungry person might want it.
The mamak menu turned roti canai into a whole idiom. Roti telur folds in a beaten egg. Roti bawang adds onion. Roti tisu is stretched impossibly thin and cooked crisp into a towering cone, sweet with sugar. Roti planta is slathered with margarine, and roti bom is coiled extra-tight and rich. Beneath all of them sits the same base: an enriched, fat-laced dough rested until it can be stretched to translucency, then folded so it cooks up in dozens of thin, separate leaves.
That folded-and-coiled structure puts roti canai in the same technical family as the ghee-layered paratha of North India, which builds its flakes by folding a rolled disc rather than stretching a sheet. And on a mamak table it rarely travels alone. The same coconut-and-sambal world it lives in gives us nasi lemak, the fragrant coconut rice that is Malaysia’s other great breakfast, and the toast-and-egg ritual of Singaporean kaya toast sits just down the same street.
The twist: an oil bath and a long sleep
Most home recipes fail at one point, and it is not the stretching. It is patience. The single most important step in this whole recipe is the rest: after shaping the dough into balls you submerge them in oil and soft ghee and leave them, ideally overnight, and that soak is not optional flavour, it is the mechanism.
Two things happen while the balls sit. The gluten you built by kneading relaxes fully, so the dough stops springing back and becomes wildly extensible, able to stretch to a sheet you can read through. And the fat slowly works into the surface, lubricating the layers so that when you coil and cook them they stay separate instead of fusing into a dense pancake. Skip or shorten the soak and the dough tears into a mean little disc and bakes up bready. Give it four hours, better still a full night in the fridge, and the same dough turns silky and obedient.
The condensed milk in the dough earns its place too. It brings sugar for browning and a faint dairy richness that reads as authentically mamak, because the stalls use it, and it helps the crust take on that deep tan without burning.
Stretching without fear
You will not throw the dough over your head, and you do not need to. Oil the worktop generously, flatten a ball with your palm, and push it outward from the centre with the heels of your hands, working around the disc, until it is a large, thin, uneven sheet. Where it is too thick, lift and stretch a section over the backs of your hands. Holes and tears do not matter at all; they close up when you fold. Thinness is the goal, not neatness. The thinner the sheet, the more layers you build, and the flakier the result.
Then comes the fold that makes the flakes. Gather the sheet loosely along its length into a rippled, ribbon-like rope, keeping air and fat trapped in the ruffles rather than pressing it flat. Coil that ribbon into a spiral, snail-shell fashion, and tuck the tail underneath. Rest the coils ten minutes so they relax, then press each into a round with your fingertips, loosely, so you flatten it without crushing the spiral. Roll it hard and you glue the layers shut; press it gently and they stay as leaves.
Griddling, and the clap
Cook on a flat, heavy pan over medium-high heat with a slick of ghee. You want deep golden brown with dark blistered freckles, two to three minutes a side, hot enough to crisp the outside before the inside goes tough but not so fierce it scorches. When it comes off the pan, the layers are cooked but still clinging together. The final move, and it feels absurd the first time, is to clap the hot roti sharply between your open palms, or scrunch it inward from the edges. That shock cracks the coil open and fluffs the flakes apart into the ragged, airy texture that separates a real roti canai from a flat fried bread. Mind your hands; it is hot.
Dhal, tips and fixes
Roti canai wants something wet to drag through. A quick dhal, made from red lentils simmered soft with turmeric, then finished with a tempering of ghee, mustard seeds, curry leaves, garlic and dried chilli, takes twenty minutes and is the classic partner. A fish or chicken curry works too.
If the dough tears into small stiff pieces, it has not rested enough or the gluten was under-kneaded. Knead a full ten minutes next time and give the oil bath the whole night.
If the roti cooks up dense and bready, you either rolled the coil too flat or your pan was too cool. Press gently, and get the griddle properly hot.
If it browns before it crisps, the heat is too high; drop it a notch so the layers have time to set.
Make-ahead: the oiled dough balls keep two days in the fridge, so you can mix on Saturday and griddle fresh on Monday. Cooked roti reheats surprisingly well in a hot dry pan for a minute a side, and freezes cooked, separated by paper, for a month.
Once the oil bath and the clap become second nature, roti canai stops being a restaurant treat and becomes the thing you make when the fridge is bare but there is flour, an egg and half an hour, which in my kitchen is most weeknights.
Related Content