Nanaimo Bars with a Custard Middle
Canada's no-bake three-layer square, with a malted twist
Contents
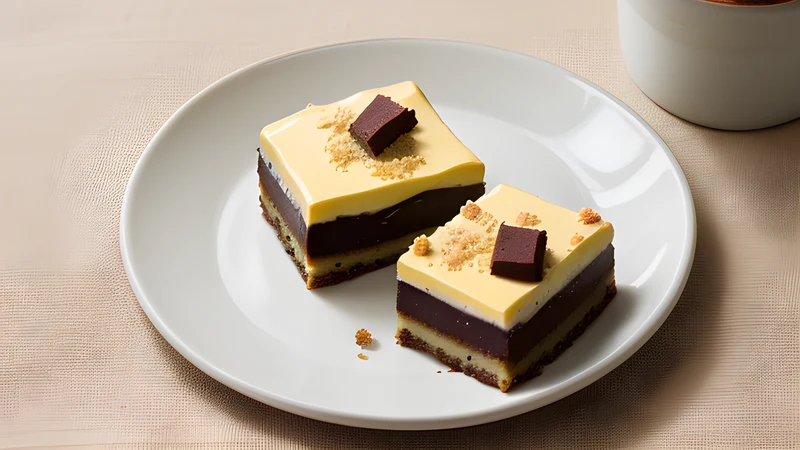
↓ Jump to recipeNanaimo bars are the great no-bake achievement of Canadian home baking: three distinct layers, no oven, and a texture that goes crumbly, then creamy, then snappy in a single bite. A dark cocoa-and-coconut crumb base, a pale custard-flavoured middle, and a thin lid of dark chocolate that cracks when your teeth go through it. They come from Vancouver Island and they are unapologetically sweet, so my one change is a spoonful of malted milk powder folded into the middle layer. It gives that pale custard filling the toasty, biscuity depth of a malted milkshake and takes just enough edge off the sugar to make a second square feel like a good idea.
Nanaimo Bars with a Custard Middle
Ingredients
- 125g unsalted butter (for the base)
- 50g caster sugar
- 5 tbsp cocoa powder
- 1 tsp vanilla extract
- 1 large egg, beaten
- 200g digestive biscuits, crushed to crumbs
- 75g desiccated coconut, lightly toasted
- 60g almonds, toasted and finely chopped
- 100g unsalted butter, softened (for the middle)
- 3 tbsp double cream
- 2 tbsp custard powder
- 1 tbsp malted milk powder
- 300g icing sugar, sifted
- 150g dark chocolate (about 55%), chopped
- 30g unsalted butter (for the top)
Method
- Line a 20cm square tin with parchment, leaving an overhang on two sides.
- For the base, melt the 125g butter in a heatproof bowl set over barely simmering water, then whisk in the caster sugar, cocoa and vanilla.
- Whisk in the beaten egg and keep stirring for 2 to 3 minutes until the mixture thickens to a loose custard that coats the spoon.
- Off the heat, stir in the biscuit crumbs, toasted coconut and almonds until evenly coated, then press very firmly into the tin and chill for 30 minutes.
- For the middle, beat the softened butter with the cream, custard powder and malted milk powder until smooth, then beat in the icing sugar until pale and spreadable.
- Spread the middle evenly over the chilled base and return to the fridge for 20 minutes until firm.
- For the top, melt the dark chocolate with the 30g butter over the same pan of hot water until glossy, then pour over the set middle and tilt the tin to level it.
- Chill for 10 minutes, then score into 16 squares while the chocolate is still soft-set so it does not crack, and chill again to set fully before cutting through.
A square named for a city
The bar takes its name from Nanaimo, a harbour city on the east coast of Vancouver Island in British Columbia. The most-cited origin story points to a 1953 cookbook from the Ladysmith and Cowichan Women’s Institute, where a recipe for “Chocolate Squares” appears with all the familiar layers; by 1966 the Nanaimo name was in print in the Vancouver Sun, and the city has claimed it wholeheartedly ever since, right down to an official recipe and a downtown “Nanaimo Bar Trail.” Similar unbaked chocolate-crumb slices show up across mid-century North American and British community cookbooks, which makes sense given the shared cupboard of the era: cocoa, custard powder, tinned coconut and biscuit crumbs were the reliable staples of a post-war pantry.
Custard powder is the quiet hero and worth explaining, because it is a very British and Commonwealth ingredient. It was invented by Alfred Bird in Birmingham in 1837, reportedly because his wife was allergic to eggs, and it is essentially coloured, vanilla-scented cornflour. In the middle layer it does two jobs: it lends that unmistakable pale-yellow custard flavour, and its starch helps the buttercream set firm rather than stay greasy. There is no real substitute for the flavour, though instant vanilla pudding mix is the usual North American stand-in. If you have made a batch of melting moments with custard buttercream, you already know exactly how that custard-powder note behaves in butter and sugar.
The base: a cooked crumb, not just pressed
The base is where people go wrong, because it is not simply crushed biscuits and butter pressed into a tin. It is a cooked mixture. You melt butter with sugar and cocoa, then whisk in a beaten egg over gentle heat until it thickens like a loose custard, and only then fold in the crumbs, coconut and nuts. That brief cooking is what binds the base into a firm, sliceable layer that holds together under the knife instead of crumbling apart.
Use a bowl set over barely simmering water so the egg thickens gently and never scrambles; the moment it coats the back of the spoon and holds a line when you draw a finger through, it is done. Keep the water at a bare tremble, not a rolling boil, and stir the whole time. Toasting the coconut and the almonds first is a small step with a big payoff, deepening the flavour and stopping the base tasting of raw, papery coconut. Spread the desiccated coconut on a dry tray in a 160C fan oven for 4 to 5 minutes until pale gold, watching closely because it turns from blond to burnt in seconds, and toast the almonds alongside for a couple of minutes more.
Press the base in hard. Use the flat bottom of a glass or a measuring cup and really compact it into an even, dense slab, right into the corners. A loosely pressed base fractures when you cut the finished bars, so this is the moment to be firm. Then chill it properly before the middle goes on.
The middle, and the malt
The middle is a custard buttercream, and its job is to be soft and creamy against the firm base and the crisp top. Beat softened butter with the custard powder, a splash of double cream and, here, a tablespoon of malted milk powder, then beat in sifted icing sugar until it is pale and spreadable. The malt is the twist. Malted milk powder is made from malted barley, wheat flour and milk, dried to a fine powder, and it carries a toasty, faintly savoury sweetness that reads like Horlicks or a good malted milkshake. Stirred into the classic filling, it rounds out the flavour and gives the whole square somewhere more interesting to go than pure sweetness.
Beat the middle until it is genuinely smooth and light, a couple of minutes, so it spreads without dragging the base up with it. If it feels stiff, add cream a teaspoon at a time; if it feels loose, a little more icing sugar. Spread it level, then chill until firm before the chocolate goes on, because a warm middle will melt into the chocolate and muddy that clean line between the layers.
The top, and cutting without cracks
The lid is dark chocolate melted with a little butter, which keeps it glossy and, crucially, stops it setting so hard that it shatters and drags the middle apart when you cut. Use a dark chocolate around 55%; anything much higher can seize against the sweet layers, and milk chocolate makes the whole thing cloying. Pour it over the cold middle, tilt the tin to spread it thin and even, and here is the trick that saves the bars: score the portions while the chocolate is still soft-set, after about ten minutes in the fridge, then chill fully and cut through along those lines. A fully set chocolate top cracks in a spiderweb if you cut it cold, so scoring early gives you clean edges.
A hot, dry knife helps too. Warm the blade under the tap and wipe it dry between every cut, and the chocolate parts cleanly instead of splintering. The same tidy-slicing habit pays off with a tray of florentines with dark chocolate, where the setting chocolate is just as unforgiving.
Storage, make-ahead and variations
Nanaimo bars are a make-ahead dream, which is half the reason they turn up at every Canadian Christmas. They keep in an airtight container in the fridge for up to two weeks, the flavour settling and improving after a day, and they freeze superbly for up to three months. Freeze them cut, layered between parchment, and thaw in the fridge for a few hours; the base and middle survive freezing far better than most baked squares because there is no crumb to go stale. Serve them cold or barely cool, as they soften and lose their layered snap at room temperature.
For variations, mint is the classic: add a few drops of peppermint extract to the middle and tint it pale green for a grasshopper version. A tablespoon of instant espresso dissolved into the base turns it into a mocha square, and a spoon of dark rum in the middle makes them properly festive. Swap the almonds for toasted pecans or hazelnuts, or use hazelnuts and a spoon of cocoa in the middle for something close to a chocolate-hazelnut spread. If you want them richer still, they sit happily on a pudding board next to a plate of chocolate crinkle cookies, the crackled sugar tops playing nicely against these three neat, glossy layers. However you flavour them, the discipline is the same: cook the base, chill between every layer, and score the top before it sets hard.
Related Content