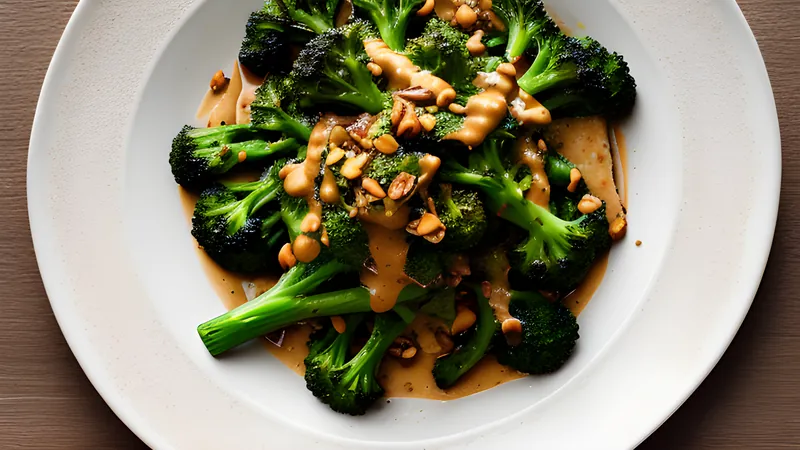
Charred Broccoli with Miso-Tahini and Crispy Garlic
Blackened florets, a savoury sesame dressing, and a shower of frizzled garlic chips
Contents
↓ Jump to recipeRoasted broccoli is good. Broccoli roasted hot enough and long enough to actually char — properly blacken at the tips of the florets while the stems stay firm and faintly sweet — is a different dish entirely, closer to a vegetable steak than a side of greens. This version pushes that char as far as it’ll go, then dresses the whole thing in a savoury, nutty miso-tahini sauce and finishes it with garlic fried until it turns brittle and golden. It’s become one of the vegetable dishes I make most often, because it takes fifteen minutes of actual effort and delivers a plate that tastes considerably more expensive than it is.
The dish doesn’t belong to one cuisine, and I’m not going to pretend it does. Charring vegetables hard under high heat is a technique borrowed loosely from Korean and Japanese grilling; miso and tahini both come from entirely different pantries, one Japanese, one from the eastern Mediterranean and Middle East, and putting them in the same bowl is a modern fusion move rather than anything traditional. What justifies it is chemistry, not heritage: miso brings fermented, umami-rich saltiness, and tahini brings ground sesame’s roasted, slightly bitter richness, and the two together make a dressing that’s more savoury and more textured than either could manage alone. I first put the two together on a night when I had half a tub of tahini left over from hummus and an open pack of miso earmarked for soup, and it turned out to be one of those accidental pairings that’s obvious in hindsight — both are thick, salty, deeply savoury pastes built from a slow fermentation or roast, and they thin out into a dressing in almost exactly the same way.
Charred Broccoli with Miso-Tahini and Crispy Garlic
Ingredients
- 2 large heads broccoli (about 700g), cut into large florets
- 3 tbsp neutral oil (vegetable or groundnut), plus extra for the pan
- 1 tsp fine salt
- 4 garlic cloves, thinly sliced
- 4 tbsp neutral oil, for frying the garlic
- 2 tbsp white miso paste
- 2 tbsp tahini
- 1 tbsp rice vinegar
- 1 tbsp honey or maple syrup
- 2-4 tbsp warm water, to loosen
- 1 tbsp toasted sesame oil
- 1 tbsp toasted sesame seeds, to finish
- 1 spring onion, thinly sliced, to finish
Method
- Heat the oven to 240C (220C fan) and put a large heavy baking tray inside to heat up for 10 minutes.
- Toss the broccoli florets with 3 tbsp oil and the salt, making sure every cut surface is coated.
- Carefully tip the broccoli onto the hot tray in a single layer, cut side down where possible, and roast for 15-18 minutes without turning, until deeply charred in patches and tender at the stem.
- Meanwhile, put the sliced garlic and 4 tbsp oil into a small cold pan and place over low-medium heat. Cook slowly, stirring often, until the garlic turns pale gold, 4-6 minutes.
- Immediately tip the garlic and its oil into a heatproof bowl to stop the cooking; the chips will crisp further as they cool.
- Whisk the miso, tahini, rice vinegar and honey together, then loosen with warm water a tablespoon at a time until the dressing is the consistency of double cream. Whisk in the sesame oil.
- Arrange the charred broccoli on a platter, drizzle generously with the miso-tahini dressing, and scatter over the crispy garlic and its oil, the sesame seeds and the spring onion.
- Serve immediately while the broccoli is still hot and the garlic still crisp.
Why high heat, and why cut-side-down
The single biggest mistake with roasted broccoli is roasting it at a moderate temperature on a tray that’s gone in cold. At 180C on a room-temperature tray, broccoli steams gently in its own moisture before it ever gets hot enough to brown, and you end up with soft, faintly grey florets that taste more boiled than roasted. This recipe fixes that with two changes: a genuinely hot oven, at 240C, and a tray that’s been preheating inside it for ten minutes before the broccoli goes anywhere near it.
A hot tray matters because it means the broccoli starts browning on contact rather than slowly warming up. This is the same principle behind preheating a griddle pan before you put a steak on it — contact heat, not just ambient oven heat, is what drives a fast, deep sear. Arrange the florets cut-side down against that hot metal and you get maximum surface area making direct contact, which is where the char actually happens; the flat-cut faces blacken and crisp while the rounded, leafy tops stay a little more textured. Skip the preheated tray and even a very hot oven will take noticeably longer to get any real colour on the broccoli, and by the time it does, the stems may already be past their best. I learned this the slow way, by roasting the same tray of broccoli three times at three different oven settings on three separate evenings, mostly out of stubbornness. At 200C the florets took nearly half an hour to get any real colour and the stems had gone past tender into mushy by the time they did; at 220C it was better but still slow; only at a proper 240C, with the tray already screaming hot, did the char actually arrive before the vegetable overcooked.
Resist the urge to stir the broccoli partway through roasting. Turning the florets exposes a fresh, un-charred face to the heat and interrupts the deep, sustained contact that builds real colour on any one surface. Fifteen to eighteen minutes untouched, then check: you’re looking for genuinely black patches at the tips, not just golden ones. Broccoli can take more heat than people expect before it turns bitter, and a little true char, tasting faintly of char rather than just roasted vegetable, is the entire point of this method. If you’re nervous about pushing it that far, pull one floret out at the fifteen-minute mark, let it cool for thirty seconds and taste it — a bitter, ashy flavour means you’ve gone too far, but a deep, almost coffee-like roastiness at the very tips means you’ve got it right.
The miso-tahini dressing
Both miso and tahini are concentrated, thick pastes, and the failure mode with a dressing like this is stopping too soon and serving something closer to a spread than a sauce. Whisk the miso, tahini, rice vinegar and honey together first while they’re still thick — this lets the ingredients combine evenly before you start adding water, since pouring liquid into a lumpy paste tends to produce a dressing with unblended pockets of miso hiding in it.
Add warm water gradually, a tablespoon at a time, whisking hard between additions. Warm water loosens tahini’s naturally stiff, almost seized texture more readily than cold water does, and you want the final consistency to sit somewhere around double cream — thick enough to cling to the broccoli rather than pooling flat on the plate, thin enough to actually coat rather than sitting in a single blob. Depending on your brand of tahini and miso, this can take anywhere from two to four tablespoons of water; add it slowly and stop as soon as the dressing drapes off a spoon rather than dropping in a clump.
White miso, sometimes labelled shiro miso, is milder and sweeter than the darker red or brown varieties, and it’s the right choice here — a red miso would push the dressing towards something heavier and more assertively fermented than the dish wants. If white miso isn’t available, a slightly reduced quantity of a milder brown miso will work, though the flavour balance shifts. Check the label if you’re buying miso for the first time: some tubs marketed simply as “miso paste” without a colour designation are actually closer to a yellow or awase blend, which sits between white and red in strength. Any of them will work here, but start with less than the recipe calls for and taste your way up, since fermented soybean pastes vary considerably in saltiness between brands.
Frying garlic without burning it
Crispy garlic is one of the easiest garnishes to ruin, because the margin between golden and burnt is measured in seconds rather than minutes. The fix is to start the garlic in a cold pan with cold oil, then bring the heat up slowly together, rather than dropping sliced garlic into oil that’s already hot. Garlic slices are thin and contain very little water, so once they hit hot oil directly they go from raw to burnt astonishingly fast; starting cold gives you a much longer, more forgiving window to watch the colour change and pull the pan off the heat the moment it turns pale gold rather than deep brown.
Tip the garlic and all its oil into a heatproof bowl the instant it looks pale gold, not deep gold — it will continue to darken and crisp for another minute or two from residual heat alone, and if you wait for the fully golden colour in the pan, you’ll end up with bitter, overcooked garlic on the plate. This is the same carry-over principle that applies to searing meat: pull it before it looks fully done, because it keeps cooking after it leaves the heat. Keep a close eye on the pan throughout rather than walking away, even briefly — this is one of the few steps in the recipe that genuinely cannot be left unattended, since the difference between perfect and ruined garlic can be as little as fifteen seconds once it starts to turn colour.
Don’t throw away the garlic-infused oil. It’s one of the most useful things in this recipe, carrying all of the roasted garlic flavour with none of the raw sharpness, and drizzling it over the finished dish along with the crispy garlic chips adds both aroma and richness that the chips alone don’t fully deliver.
Serving and pairing
This dish works equally well as a vegetable side to something plainer, or as the centrepiece of a bowl with rice and a protein. It shares a flavour family with miso-glazed aubergine, and the two make a good pair on the same table if you’re building a fully vegetarian, umami-forward spread. The tahini side of the dressing also connects it to harissa cauliflower with tahini and pomegranate — both dishes lean on tahini’s roasted, nutty backbone, just pointed in different spice directions, one towards North African harissa heat, this one towards Japanese miso umami. Both are good candidates for a mezze-style spread alongside flatbread and a simple grain salad, and both keep their dressing separately well, which makes them easy to prep ahead of a dinner where you don’t want to be cooking right up until guests arrive.
If you want to turn this into more of a main course, serve it over steamed short-grain rice with a soft-boiled egg on top; the yolk runs into the miso-tahini dressing and does most of the work of a sauce on its own.
Variations and substitutions
Swap the vegetable. This method works nearly as well on cauliflower, or on a mix of broccoli and cauliflower florets, since both hold up to hard roasting and both take on char in the same way. Sprouting broccoli, when it’s in season, chars especially well because of its thinner stems and higher surface-area-to-volume ratio.
Make it spicier. A teaspoon of gochujang or a good pinch of chilli flakes whisked into the dressing pushes it towards a Korean-leaning direction and adds welcome heat against the sweetness of the honey.
Nut-free version. If tahini is off the table for allergy reasons, sunflower seed butter is the closest substitute in both texture and roasted flavour, though the taste will be milder and slightly less bitter.
Make it a full meal. Add cubes of firm tofu, pressed and pan-fried until golden, tossed through the broccoli before dressing. The tofu soaks up the miso-tahini sauce just as readily as the vegetables do.
Storage
The broccoli itself keeps in an airtight container in the fridge for up to three days, though it will soften from its just-roasted crispness. The dressing keeps separately for up to a week and is worth making in a bigger batch, since it’s useful well beyond this one dish — try it on roasted sweet potato, steamed greens or as a dip for raw vegetables. Store the crispy garlic separately, uncovered rather than sealed, so residual steam doesn’t soften it; a loosely covered container at room temperature keeps it crunchy for a couple of days. Reheat the broccoli in a hot oven or dry pan rather than the microwave, which will turn the charred edges soft, then dress and garnish fresh rather than reheating with the sauce already on.
Related Content