Arepas: Cornmeal Pockets, Two Ways
A griddled corn cake that splits open into its own sandwich
Contents
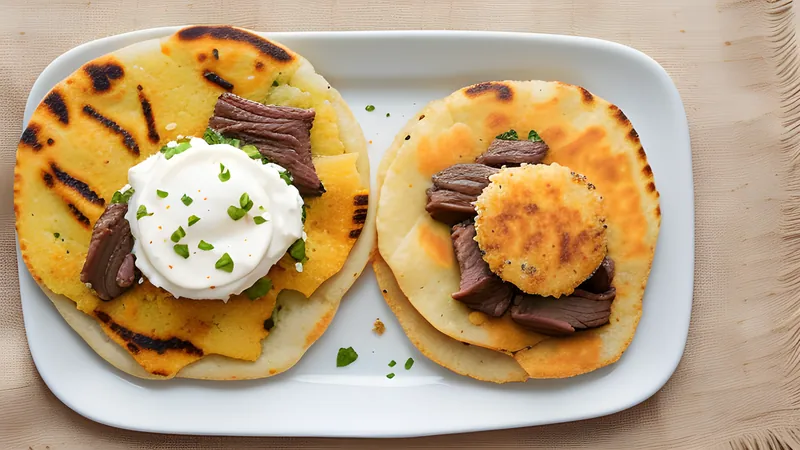
↓ Jump to recipeAn arepa does not get sliced open with a knife the way a bread roll does. You split it while it is still warm enough to steam, and the inside — dense, faintly sweet, still slightly damp from the dough — pulls apart into two matching halves that hold a filling the way a pitta does, only sturdier. Get the crust right on the outside and the whole thing works as a self-contained sandwich that needs no plate.
Arepas: Cornmeal Pockets, Two Ways
Ingredients
- 500g masarepa (precooked white cornmeal)
- 1.5 tsp salt
- 700ml warm water, approximately
- 2 tbsp neutral oil, plus more for the griddle
- 400g tin black beans, drained
- 1 small onion, finely chopped, for the beans
- 2 garlic cloves, crushed, for the beans
- 1 tsp ground cumin
- 150ml water, for the beans
- 150g queso fresco or feta, crumbled
- 300g cooked beef brisket or skirt steak, shredded
- 1 tbsp tomato puree, for the beef
- 0.5 tsp smoked paprika, for the beef
- 100ml beef stock, for the beef
- 1 ripe avocado, sliced, to serve
- Hot sauce, to serve
Method
- Whisk the masarepa and salt together in a large bowl, then stir in the warm water and 2 tbsp oil until it forms a smooth, soft dough with no dry lumps; leave to rest for 5 minutes so the flour hydrates fully.
- The dough should hold together and not crack at the edges when pressed; if it cracks, work in a little more warm water, a tablespoon at a time.
- Divide into 8 equal balls, then flatten each between your palms into a disc about 9cm across and 1.5cm thick, smoothing any cracked edges with wet fingers.
- Heat a dry or very lightly oiled griddle or heavy frying pan over medium heat and cook the arepas for 5-6 minutes per side, until a deep golden-brown crust forms.
- Transfer the griddled arepas to a baking tray and finish in an oven preheated to 190°C for 15 minutes, until they sound hollow when tapped on the base.
- Meanwhile, for the black beans, soften the onion and garlic in a splash of oil, add the cumin and beans with 150ml water, and simmer 10 minutes, mashing some of the beans against the pan; season to taste.
- For the shredded beef, warm the cooked beef in a pan with the tomato puree, smoked paprika and stock, and simmer until the liquid mostly reduces and coats the meat, about 8 minutes.
- Let the arepas cool for 2-3 minutes, then split each one horizontally almost all the way through with a sharp knife, opening it like a pitta.
- Stuff half the arepas with black beans and crumbled queso fresco, and the other half with shredded beef, adding avocado slices and hot sauce to both.
Corn that predates the conquistadors
Arepas are older than Venezuela and Colombia as nations, older than the Spanish arrival in South America, and probably older than most written food history can pin down with certainty. Archaeological evidence and early colonial accounts place a maize flatbread cooked on a hot stone griddle — a budare — among indigenous groups in the region that is now Venezuela and Colombia well before 1500, and the word “arepa” is thought to come from erepa, a term for maize in the language of the Cumanagoto people of eastern Venezuela. What changed the dish more than anything else in the last century was industrial processing: precooked, dehydrated cornmeal, sold under brand names like Harina P.A.N. since the 1960s, replaced the laborious traditional process of nixtamalising and grinding fresh corn by hand, and made arepas a five-minute weeknight bread rather than an all-morning project. Both Venezuela and Colombia claim the arepa as national food, and the rivalry over it is genuine — Colombian arepas run thinner, often unsplit, and turn up in dozens of regional variants; the Venezuelan version is thicker, always split, and treated less as a bread side and more as the entire meal, stuffed to bursting.
Getting the dough right the first time
Masarepa is not the same product as fresh masa harina used for Mexican tortillas — it has already been cooked and dehydrated, which is why it rehydrates with warm water rather than needing lime-cooked fresh corn, and using the wrong cornmeal is the single most common reason home arepas come out gritty or refuse to hold together. The dough itself should feel like soft, slightly tacky Play-Doh: press a ball flat and the edges should smooth over cleanly rather than cracking into a jagged rim. Cracked edges mean the dough is too dry, and the fix is simple — wet your hands and work in more warm water a little at a time, rather than adding it all to the bowl and ending up with something closer to porridge.
Shape the discs a little thicker than feels natural, around 1.5cm, because arepas puff and firm up as they cook and a too-thin disc dries out before the centre has a chance to steam properly.
The two-stage cook that makes the difference
The griddle-then-oven method is the one that consistently produces an arepa with a genuinely crisp, deeply browned crust and a fully cooked, tender interior, rather than one or the other. A dry or barely oiled griddle at a moderate heat colours the outside over five or six minutes a side, building a proper crust through Maillard browning rather than just drying the surface. That crust seals the disc, and finishing in the oven then cooks the dense interior through with steady, even heat, without burning the outside further. Skip the oven step and rely on the griddle alone and you end up choosing between a pale, undercooked centre or a burnt crust — there isn’t a stovetop-only sweet spot that reliably gets both right, which is the one place this recipe insists on the extra fifteen minutes.
You will know an arepa is properly cooked through because it sounds distinctly hollow when you tap the base, the same test you would use on a loaf of bread.
Beyond the split-and-stuff arepa
Not every arepa is meant for splitting. Cachapas, a related but distinct dish, use fresh sweetcorn kernels blitzed into a thick, sweet batter rather than masarepa, cooked as a soft pancake and folded around cheese instead of split and stuffed — a good weekend project once the plain version here becomes routine. Some Venezuelan households also fry the shaped discs in hot oil rather than griddling and baking them, which gives a deeper, almost doughnut-like crust and is worth trying if you have a deep pan of oil going anyway for something else. Whichever method you use, the underlying dough stays the same, which is part of why arepas remain a weeknight staple rather than an occasional-treat bread: one bag of masarepa, one bowl, no proving, no kneading.
Two fillings, two different Venezuelan tables
Black beans and crumbled white cheese (queso de mano or queso fresco, feta as a reasonable substitute outside Venezuela) is the everyday, vegetarian-friendly filling, eaten for breakfast as often as dinner — simmer tinned black beans down with softened onion, garlic and cumin until some of them break down into a thick, clinging sauce, then mash roughly rather than pureeing, so texture survives. Shredded beef, cooked low and slow then finished in a small pan with tomato, smoked paprika and stock, is closer to the filling in a reina pepiada or pabellón-style arepa, and it wants to be moist enough to cling to the bread without turning the inside soggy. A layer of sliced avocado and a shake of hot sauce belong in both versions; Venezuelans are not precious about mixing a savoury filling with something creamy and something sharp in the same bite.
What goes wrong, and why
A dense, gummy centre even after the full cooking time almost always traces back to a disc shaped too thick or a dough mixed too wet. Masarepa keeps absorbing water for several minutes after mixing, so a dough that seemed properly hydrated at the five-minute rest can turn heavier and stickier by the time you shape it; if that happens, work in a spoonful of dry masarepa rather than pressing on with a dough that will never firm up properly in the pan. The opposite fault, a dry, crumbly arepa that falls apart when split, usually means not enough water went in at the start, or the discs sat out uncovered too long before griddling and the surface dried out — keep shaped discs under a damp tea towel while you work through the batch.
Arepas that scorch on the outside before the oven stage even starts are almost always cooked over too high a heat. Masarepa’s natural sugars caramelise fast, and a griddle hot enough to sear a steak will blacken an arepa’s crust in under two minutes while the interior stays raw. Medium heat and the full five to six minutes a side is what lets the crust build gradually enough for the residual heat to start working on the centre before the oven takes over.
Variations across the region
Beyond the classic split-and-stuff version, Venezuelan and Colombian cooks treat arepas as a base for dozens of regional riffs. Arepas de chócolo, made with a little sugar and grated fresh sweetcorn worked into the masarepa dough, come out faintly sweet and are traditionally paired with a slice of salty white cheese pressed inside while still hot, so it half-melts against the warm dough. In the Andean regions of Colombia, arepas are sometimes made with a mix of masarepa and wheat flour and griddled thinner, closer to a flatbread meant for scooping up other food rather than splitting and filling. Adding grated cheese directly into the dough before shaping — rather than only stuffing it inside afterwards — is a common home shortcut that produces a richer, saltier crust, worth trying once the basic method feels automatic.
For a genuinely different texture, some cooks fry small, flattened arepitas in hot oil until deeply golden rather than griddling and baking them; they puff slightly and develop a crisp, almost fritter-like shell, and work well as a snack-sized version served alongside drinks rather than as a full meal.
Make-ahead and freezing tips specific to the dough
The raw, shaped dough discs themselves freeze well, layered between baking paper in a single container, and can go straight from the freezer onto a hot griddle with an extra two or three minutes added to the first side. This is worth doing over freezing the cooked bread if the plan is to serve arepas properly fresh and hot rather than reheated, since a griddled-from-frozen arepa develops a better crust than one thawed, reheated and re-crisped. Cooked, split and cooled arepas can also be stuffed, wrapped individually in foil, and frozen as a complete sandwich — useful for lunches, though the filling should be on the drier side (the shredded beef, not the beans) since a wet filling makes the bread soggy on thawing.
Splitting, storing and getting ahead
Let the arepas rest for two or three minutes out of the oven before splitting — cut them too soon and the interior is still gluey; wait too long and the crust cools enough to resist the knife cleanly. Split horizontally with a sharp knife almost all the way through, leaving a hinge along one edge, then open it like a pitta and pack the filling in generously rather than tucking in a token spoonful. Cooked, unfilled arepas keep well wrapped in the fridge for three days, or frozen for a month, and reheat best split open and toasted directly in a dry pan rather than microwaved, which brings the crust back rather than leaving it soft. Leftover fillings freeze just as well, so it is worth making a double batch of the beans specifically for this — they also work spooned over rice, or alongside black bean tacos with charred corn salsa if you want to lean into a wider Latin American spread. If you are already working through a run of slow-cooked Latin dishes, the shredded beef here sits comfortably next to something like feijoada with smoked pork and black beans on the same table — different countries, the same instinct for turning a few pantry staples into something that feeds a family properly.
Related Content