Pandesal: The Morning Roll With Breadcrumb Crust
A misleading name for a bread that's actually mildly sweet
Contents
↓ Jump to recipePandesal’s name is one of the small, enduring jokes of Filipino food vocabulary. “Pan de sal” translates directly from Spanish as “bread of salt,” yet the bread itself is mildly sweet, never savoury, and no household making it today would describe the finished roll as salty in any real sense. Food historians point to the sugar rationing of the Second World War and the years immediately after as the likely explanation: with sugar scarce and salt comparatively available, bakers of the era are believed to have adjusted their standard bread formula, and something in the balance shifted enough over subsequent decades that the modern pandesal ended up on the sweet side of neutral, carrying a name that no longer describes what it actually tastes like. Whether that account is the full story or a convenient explanation retrofitted after the fact, it’s the version most commonly repeated, and it captures something true about how much everyday bread recipes drift over generations of scarcity and adaptation.
Pandesal: The Morning Roll With Breadcrumb Crust
Ingredients
- 500g bread flour
- 7g instant yeast
- 70g sugar
- 2 tbsp milk powder
- 1 tsp salt
- 280ml warm water
- 1 egg
- 40g butter or neutral oil, softened
- 100g dry fine breadcrumbs, for coating
Method
- In a large bowl, whisk together the flour, yeast, sugar, milk powder and salt.
- Add the warm water, egg and softened butter. Mix to a rough dough, then knead for 10 minutes by hand (or 6–7 minutes in a stand mixer) until smooth and elastic.
- Place in a lightly oiled bowl, cover, and prove in a warm place for 1 hour, until doubled in size.
- Punch down the dough and divide into two equal portions. Roll each into a log about 25cm long.
- Cut each log into 8 equal pieces (16 total). Roll each piece into a smooth ball, then roll in the dry breadcrumbs to coat evenly.
- Place the rolls on a lined baking tray, spaced 3cm apart. Cover loosely and prove for a further 45 minutes until puffy.
- Preheat the oven to 200°C (fan 180°C).
- Bake for 12–15 minutes, until the tops are just golden — pandesal is traditionally pale rather than deeply browned.
- Cool on a wire rack for 5 minutes before serving warm.
The breadcrumb coating
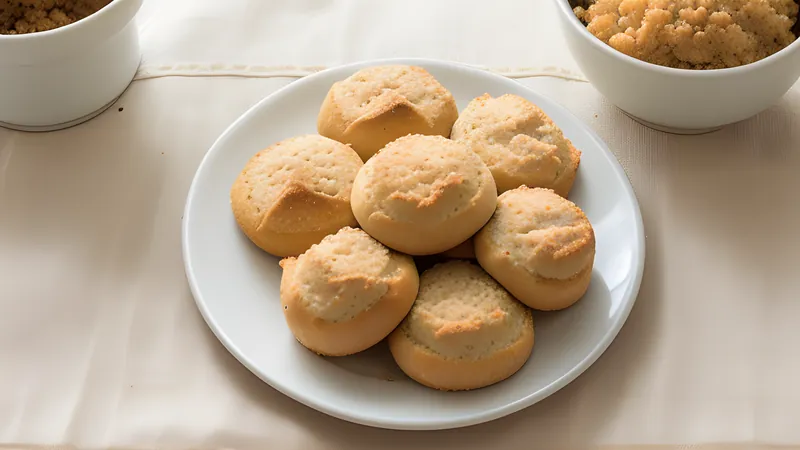
The detail that makes pandesal instantly recognisable by sight, before you’ve even tasted it, is its dry, fine breadcrumb coating — rolled onto the dough ball just before its final proof, giving the baked roll a slightly textured, matte exterior rather than a smooth, shiny crust. The coating serves a genuine function beyond appearance: it absorbs surface moisture during baking, helping the outside stay drier and slightly more textured against the very soft, slightly sweet crumb inside, a contrast that plain, uncoated dough doesn’t achieve in the same short bake time. Traditionally, the breadcrumbs used were simply leftover stale bread, dried and crushed by hand — a thrifty, waste-avoiding touch consistent with the same postwar frugality some historians link to the bread’s overall recipe. Modern bakeries often use commercial dry breadcrumbs or even a fine cornflour-based coating for consistency, but the effect aimed for is the same regardless of source.
Pale on purpose
Unlike most Western bread rolls, which are baked until the crust turns a deep golden-brown, pandesal is meant to come out of the oven noticeably pale — a light gold at most, never approaching the darker, more caramelised crust of a typical dinner roll elsewhere. This isn’t undercooking; it’s a deliberate stylistic choice tied to the bread’s texture. Pandesal’s appeal rests on a very soft, almost pillowy crumb and a crust that gives easily rather than crackling, and a longer bake aimed at deeper colour would dry the crumb out and firm up the crust well past what the bread is meant to be. Bakers judge doneness more by touch and time than by colour here — a properly baked pandesal springs back gently when pressed and sounds hollow when tapped on the base, even while looking underdone by the standards of a typical brown crusty roll.
Method notes
Milk powder in the dough is a small but meaningful addition, contributing to both the crumb’s softness and a faint dairy richness without the extra liquid a splash of fresh milk would add, which could throw off the dough’s hydration if the recipe isn’t adjusted to compensate. If you don’t have milk powder, substituting some of the water with fresh milk works, though you may need to reduce the water slightly to keep the dough’s hydration in the same range.
Kneading pandesal dough to full elasticity matters more than it might seem to for what looks like a simple bread — a soft, sweet enriched dough like this needs a properly developed gluten network to trap gas during its two proofs and rise into the light, airy crumb the bread is known for. Under-kneaded dough bakes up denser and chewier, closer to a plain bun than the specific soft, slightly stretchy texture pandesal is meant to have.
What can go wrong
The most common mistake is over-baking in pursuit of a golden colour that doesn’t belong here — resist the instinct, built from baking Western-style bread, to leave rolls in until they’re deeply browned. Pull them at a pale gold, trusting touch and the hollow-sound test over visual colour alone.
The second is skipping the second, shorter proof after shaping. Pandesal dough, like most enriched doughs, needs that final rest to puff up properly before baking; skip it and go straight into the oven, and the rolls come out denser and smaller than they should, since the yeast hasn’t had a chance to produce enough gas in the shaped dough before the oven’s heat sets the structure.
Substitutions and variations
Some bakeries add a small amount of ube extract or filling to make ube pandesal, a modern variation that tints the crumb purple without significantly changing the base recipe’s texture. A cheese-filled version, with a small cube of quickmelt tucked into the centre of each roll before shaping, is a popular breakfast variant sold at bakeries across the country, giving a savoury, gooey surprise inside the otherwise plain sweet roll.
For households without access to dry breadcrumbs, a light dusting of fine semolina or even plain flour gives a similar textured exterior, though neither produces quite the same dry, absorbent crust that proper breadcrumbs do.
Storage
Pandesal is best eaten the day it’s baked, ideally still warm, when the crust is at its most tender and the crumb hasn’t had time to firm up. It keeps for up to two days at room temperature in a paper bag — plastic traps moisture and softens the crust unpleasantly — and reheating briefly in a low oven (150°C for 4–5 minutes) revives most of its just-baked texture. The dough also freezes well after shaping and coating but before the final proof: freeze the rolls on a tray until solid, then bag them, and thaw overnight in the fridge before letting them complete their proof and baking as normal.
The classic way to eat pandesal is split open and dunked in coffee, or filled with a slice of corned beef or a fried egg for a fuller breakfast. Pair it with ensaymada for a two-bread merienda spread, or serve it as the plain, everyday counterpoint to something richer like leche flan at the end of a meal.
The daily rhythm around it
Pandesal is bound up with a specific daily ritual in most Filipino households: it arrives fresh, warm, sold in small neighbourhood bakeries (panaderias) or by street vendors pedalling bicycles with baskets strapped to the back, often before six in the morning, timed for a population that eats breakfast early and expects the bread to still be warm when it reaches the table. That freshness window matters enormously to how the bread is judged — a pandesal bought warm, minutes from the oven, is considered a genuinely different eating experience from one bought even a few hours old, softer and more fragrant in a way that doesn’t fully survive the day. This is part of why pandesal, unlike many breads that travel well, remains overwhelmingly a locally produced, same-day product even in an era when much of the rest of the food supply chain has shifted towards centralised, longer-shelf-life production. Large commercial bakeries do produce packaged pandesal for supermarket shelves, but it’s widely regarded, even by people who buy it regularly out of convenience, as a lesser version of what a neighbourhood panaderia turns out each morning.
Bread flour and why it matters here
Using a genuine bread flour rather than an all-purpose or plain flour makes a real difference to pandesal’s characteristic chew-against-softness texture. Bread flour’s higher protein content develops a stronger gluten network during kneading, which traps the gas produced by the yeast more effectively and gives the crumb enough structure to stay light and airy rather than collapsing under its own moisture and sugar content. A dough made with plain flour instead tends to bake up denser and slightly gummier, missing some of the open, tender crumb structure that a well-kneaded, properly gluten-developed dough achieves. If bread flour genuinely isn’t available, plain flour works as a substitute in a pinch, but expect a noticeably denser result and consider extending the kneading time by a few extra minutes to compensate for the flour’s lower protein content.
Shaping for even rolls
Rolling each portion of dough into a smooth, taut ball before coating in breadcrumbs is worth doing carefully, since an unevenly shaped piece bakes unevenly too — a roll with a thin, stretched patch of dough on one side will brown and dry out faster in that spot than the rest of the piece. Cup the dough under your palm against the work surface and move it in small, firm circles; the friction against the counter pulls the surface of the dough taut, creating a smooth skin that holds its shape through both the final proof and the oven’s heat. Rolls shaped this way rise more evenly and hold a rounder, more consistent form than ones simply pinched into a rough ball by hand.
Judging the second proof
The final proof after shaping is short, typically 45 minutes, but its endpoint is judged by touch rather than a fixed clock, since ambient temperature affects proofing speed considerably. Press a fingertip gently into the side of a proofed roll: it should leave an indent that slowly springs back about halfway, rather than fully and instantly (under-proofed) or not at all (over-proofed). Getting this stage right has more influence on the final texture than almost any other step in the process — an under-proofed roll bakes dense despite a perfectly kneaded dough, while an over-proofed one can collapse slightly in the oven’s initial heat, losing the rounded shape it held going in.
Any rolls left unshaped or unbaked by the end of a session can go straight into the freezer at the shaping stage rather than being forced through a rushed bake — a far better outcome than baking a batch under-proofed just to finish the job in one sitting.
Warm pandesal keeps well enough in a covered basket lined with a clean cloth for the length of a family breakfast, retaining most of its softness for the hour or so it typically takes a household to work through a fresh batch.
Related Content