Damper: The Camp Bread Baked in Ashes
The stockman's soda bread, baked in a camp oven or straight in the coals
Contents
↓ Jump to recipeThere’s a version of damper that involves nothing more than flour, water, and a stick, wrapped around a spit and held over open flame until it’s charred outside and barely cooked within. There’s another version, closer to what most Australian kitchens actually make today, that’s really a simple soda-style bread baked in an oven. Both are called damper, and the gap between them tells you almost everything about how the dish evolved from genuine survival food into a cultural touchstone that’s now more often eaten for nostalgia than necessity.
Damper: The Camp Bread Baked in Ashes
Ingredients
- 450g self-raising flour, plus extra for dusting
- 1 tsp fine sea salt
- 50g cold butter or lard, cubed
- 300ml full-fat milk, plus extra for brushing
- 1 tbsp milk or melted butter, for the crust
Method
- Preheat an oven to 220C (200C fan), or prepare a bed of hot campfire coals with a camp oven if cooking outdoors.
- Sift the flour and salt into a large bowl. Rub in the butter with your fingertips until the mixture resembles coarse breadcrumbs.
- Make a well in the centre and pour in the milk. Mix quickly with a butter knife until it just comes together into a shaggy dough — do not overwork it.
- Turn out onto a lightly floured surface and shape gently into a round, about 20cm across and 5cm deep. Do not knead beyond bringing it together.
- Place on a floured baking tray or directly into a well-greased camp oven. Score a deep cross into the top with a sharp knife, cutting about 2cm down.
- Brush the top with milk or melted butter.
- Bake for 30-35 minutes until deeply golden and the loaf sounds hollow when tapped on the base. If cooking in a camp oven over coals, rotate it every 10 minutes and check at 25 minutes.
- Cool on a wire rack for at least 10 minutes before tearing or slicing. Serve warm with butter and golden syrup.
Bread for people without an oven
Damper’s origins sit squarely with stockmen, drovers and shearers working Australia’s vast interior in the nineteenth century, days or weeks from the nearest town, carrying flour, salt and not much else. With no oven and often no yeast to hand, the solution was a simple unleavened or soda-leavened dough, shaped into a rough round and buried directly in the hot ashes of a campfire, or baked in a cast-iron camp oven set into the coals. The ash itself doesn’t burn the bread the way it sounds like it should — a properly built fire produces a layer of fine, cool-enough ash on top of the coals that insulates rather than incinerates, and the loaf is often wrapped in foil or a cloth in modern versions, though old-timers swear the direct-ash method gives a better crust.
The name itself likely comes from “to damp” — to dampen flour into a workable dough — rather than referring to any particular texture, though there’s genuine dispute among food historians about the etymology. What’s not in dispute is the practical logic: flour kept indefinitely without spoiling, salt was cheap and stable, and a dough needing no proving time meant a stockman could mix, shape and bury a loaf in coals within minutes of stopping for the night, then have bread ready before he’d finished making tea in the billy.
Soda bread’s Australian cousin
Modern damper, using self-raising flour or a baking soda and cream of tartar mix, is close kin to Irish soda bread, and for good reason — much of the flour-and-dairy baking tradition that shaped colonial Australian cooking arrived with Irish and British settlers, adapted to what was available in a harsher, drier climate with far less reliable access to fresh yeast. The soda-leavened version rises quickly under oven heat without needing hours of fermentation, which suited a working life with no time to spare and no reliable warm spot to prove a yeasted dough overnight.
Older recipes sometimes used just flour, water and salt with no raising agent at all — a true damper, dense and close-textured, baked directly in ash without rising much beyond what steam alone could achieve. That version still exists among traditionalists and bushwalkers who want the most authentic possible camp experience, but it produces a noticeably heavier, more compact loaf than the self-raising version most people expect today. This recipe uses self-raising flour deliberately, because it gives the light, cracked-crust result that damper is known for in contemporary Australian kitchens, while staying true to the same short ingredient list and quick, rough-handed method.
Why you barely touch the dough
The single most important instruction in this recipe is also the easiest to ignore: don’t knead it. Bread doughs built on wheat gluten development, like a sourdough or a sandwich loaf, need kneading to build structure and chew. Damper is the opposite kind of dough — closer to a scone mix than a bread dough — and overworking it develops gluten you don’t want, producing a tough, dense, rubbery result instead of the soft, slightly crumbly interior a good damper should have. Mix it only until the flour is hydrated and it holds together as a shaggy mass, then shape it gently with your hands into a round. If it looks a little rough and uneven on the surface, that’s correct, not a mistake to fix.
The deep cross scored into the top before baking isn’t decorative. It helps the loaf expand evenly during baking rather than splitting unpredictably at a weak point, and it increases the amount of crust relative to crumb — damper’s appeal is as much about that thick, deeply golden crust as it is about the soft interior underneath.
Camp oven versus kitchen oven
A camp oven — a heavy cast-iron pot with a flanged lid designed to hold hot coals on top as well as underneath it — gives the most authentic result and the most even heat of any outdoor method, since coals both above and below mimic a real oven’s convection far better than a single bed of embers under a pot. If you’re baking outdoors, dig a shallow pit, build a solid bed of coals (not open flame — you want steady heat, not licking fire), and nestle the camp oven in with a few shovelfuls of hot coals raked onto the lid as well. Rotate the pot every ten minutes if you can manage it without losing too much heat, since coal beds are rarely perfectly even.
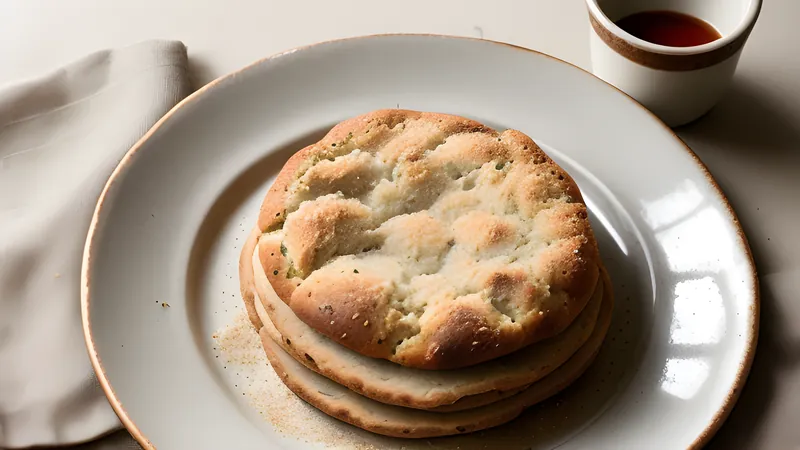
A conventional kitchen oven at 220C produces a nearly identical result with far less guesswork, which is why this recipe defaults to it — the crust develops the same deep golden colour and the same characteristic cracking, and a hollow sound when you tap the base is the same doneness test whether you’re in a kitchen or beside a fire.
What can go wrong
A dense, gummy loaf is almost always the result of overworking the dough or using too little raising agent. Self-raising flour loses potency over time, particularly if it’s been sitting open in a humid pantry, so if your damper hasn’t risen well and the crumb looks tight and pale rather than airy, check the flour’s age before blaming the method — a flour more than six months past opening often underperforms. Mixing too long or too vigorously develops gluten damper doesn’t want, so if you notice the dough turning smooth and elastic rather than staying rough and shaggy, stop immediately even if it means baking a slightly uneven-looking loaf.
A pale, soft crust usually means the oven wasn’t hot enough to start, or the loaf came out too early. Damper wants a hot oven from the first minute — 220C is not excessive for a loaf this size — because the crust needs to set and colour quickly while the interior is still rising, rather than baking through slowly at a gentler heat the way a large yeasted loaf might. If the base sounds dull rather than hollow when tapped, give it another five minutes; a slightly over-baked damper is far better than an under-baked one, which will taste distinctly of raw flour at the centre.
A cracked, uneven surface with the cross splitting unpredictably rather than opening cleanly usually means the score wasn’t deep enough. Cut a full two centimetres down with a sharp knife rather than a shallow surface score — the cross needs to act as a genuine weak point that the loaf can expand through, not just a decorative mark.
Serving damper properly
Damper is eaten warm, torn rather than neatly sliced, with butter melting into the rough interior and, traditionally, a generous drizzle of golden syrup — the same dark, treacly syrup that turns up in lamingtons icing and countless other Australian bakes. Some households serve it savoury instead, alongside a stew, using it the way you’d use a crusty white loaf to mop a plate clean. Both are correct; damper was never precious about how it got eaten, only about getting a loaf of bread out of minimal ingredients as quickly as possible.
Variations
Cheese and herb versions, with grated cheddar and chopped rosemary or chives worked briefly into the dry ingredients before the milk goes in, are common in contemporary Australian kitchens and cafes, though they move the dish toward a savoury quick bread rather than the plain original. Some cooks substitute beer for some or all of the milk, which adds a faint yeasty depth and a slightly denser crumb — a reasonable variation if you happen to have a half-finished stubby on hand, in the spirit of using whatever’s available that damper was built on in the first place.
A sweeter version, with a spoonful of sugar worked into the dry mix and sultanas folded through before shaping, turns damper into something closer to a fruit scone loaf, good served with jam and cream. None of these variations are more “correct” than plain damper — the dish has always adapted to what a particular camp, kitchen or era had on hand.
Cooking it the truly old way
If you want to try the direct-ash method rather than a camp oven, build a substantial campfire and let it burn down to a thick bed of glowing coals with a fine layer of grey ash on top — this takes longer than most people expect, often 45 minutes to an hour of steady burning, since a fire still producing flame or thick smoke is too hot and too inconsistent. Shape the dough into a slightly flatter, thicker round than you would for oven baking, dust it generously with extra flour to form a protective outer layer, and nestle it directly into the ash bed, then rake a covering layer of ash and a few coals over the top.
Cooking time is harder to judge than in an oven since fire beds vary enormously in heat, but 25-35 minutes is typical, checked by pulling the loaf partway out and tapping the base. Brush or knock off the ash coating once it’s done — a properly baked ash damper has a slightly floury, matte crust rather than the shiny golden one an oven produces, and a faint smoky char note that’s part of the appeal rather than a flaw.
Storage
Damper is at its absolute best within an hour or two of coming out of the oven, while the crust is still audibly crisp and the interior still faintly steaming. It doesn’t keep especially well beyond a day — the crust softens quickly once wrapped, and the interior can turn slightly gummy by day two. Store any leftovers wrapped in a tea towel rather than an airtight container, which traps less moisture against the crust, and refresh a stale loaf with five minutes in a hot oven before serving again. It freezes acceptably whole or sliced for up to a month, thawed at room temperature and then warmed through in the oven to bring the crust back.
For more of Australia and New Zealand’s straightforward baking traditions, lamingtons and afghan biscuits both share damper’s approach of turning a short pantry list into something distinctive through method rather than exotic ingredients.
Related Content