Cheung Fun: Steamed Rice Noodle Rolls
Silky steamed rice noodle sheets, rolled and doused in sweet soy
Contents
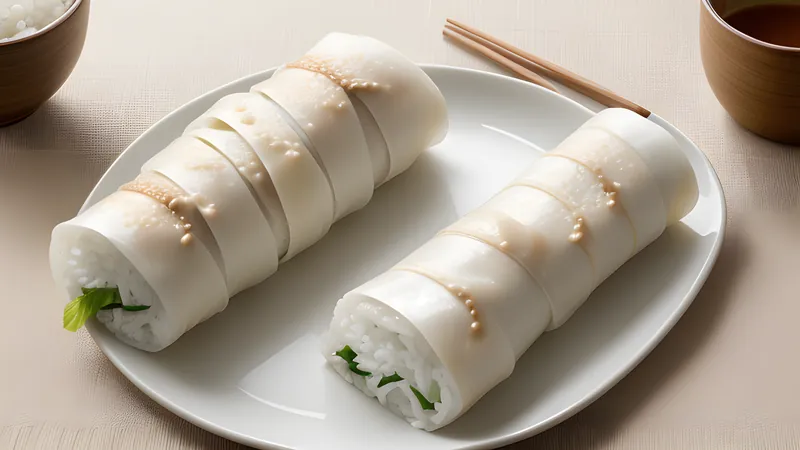
↓ Jump to recipeCheung fun is deceptively simple to describe and genuinely difficult to nail on the first attempt: a thin rice batter, steamed flat, rolled while warm, doused in a sweet-savoury soy sauce. Every dim sum restaurant serves some version of it and almost every version tastes slightly different, because the ratio of rice flour to starch, the thinness of the layer, and the sauce all vary enough between kitchens to change the dish meaningfully. Get the batter right and you end up with something genuinely silky, almost slippery, with just enough structure to hold its roll. Get it wrong and you end up with something either gluey or, worse, one that tears the moment you try to lift it off the tray.
Cheung Fun: Steamed Rice Noodle Rolls
Ingredients
- 150g rice flour
- 30g wheat starch
- 15g cornflour
- 1/2 tsp salt
- 1 tbsp vegetable oil, plus more for greasing
- 375ml cold water
- 125ml boiling water
- 3 tbsp light soy sauce, for the sauce
- 1 tbsp dark soy sauce, for the sauce
- 1 tbsp oyster sauce, for the sauce
- 1 tsp sugar, for the sauce
- 100ml water, for the sauce
- 1 tsp sesame oil, for the sauce
- 2 spring onions, finely sliced, to finish
- 1 tbsp toasted sesame seeds, to finish
Method
- Whisk the rice flour, wheat starch, cornflour and salt together in a bowl. Add the cold water and 1 tbsp oil and whisk until completely smooth with no lumps.
- Pour in the boiling water in a thin stream while whisking constantly, until the batter turns slightly translucent and thickens very slightly. Strain through a sieve to remove any lumps and rest for 10 minutes.
- Set up a steamer with plenty of water at a rolling boil. Lightly oil a flat, rimmed metal tray or plate that fits inside your steamer.
- Stir the batter well (it settles quickly), then ladle a thin, even layer over the oiled tray, just enough to coat the base.
- Place the tray in the steamer, cover, and steam over high heat for 3-4 minutes, until the sheet is set, translucent and slightly blistered.
- Remove the tray and let it cool for 30 seconds, then use a lightly oiled scraper or spatula to loosen one edge and roll the sheet up into a tight cylinder.
- Slide the roll onto a serving plate and repeat with the remaining batter, re-oiling the tray each time.
- For the sauce, combine both soy sauces, oyster sauce, sugar and water in a small pan and bring to a brief simmer, then stir in the sesame oil off the heat.
- Cut the rolls into shorter lengths if you like, pour the warm sauce over generously, and scatter with spring onion and sesame seeds before serving.
Rice sheet, not rice noodle, in the strictest sense
Cheung fun translates roughly to “intestine noodle,” an evocative and not entirely appetising reference to the long, rolled shape rather than any actual ingredient. Unlike wheat or extruded rice noodles, cheung fun starts life as a liquid batter poured thin and steamed flat into a sheet, closer in process to a crepe than to a boiled noodle, and it’s this steaming method that gives the finished noodle its distinctive, almost translucent, slightly jiggly texture — nothing like the firmer bite of a boiled rice stick noodle.
The dish has its roots in Guangdong province and specifically in the rice-growing regions around Guangzhou, where rice flour was cheap and plentiful and steaming was already the dominant cooking method in local kitchens. It travelled to Hong Kong alongside the broader migration of Cantonese cuisine through the twentieth century and became one of the fixtures of the yum cha trolley there, sold both as a restaurant dim sum item and, in a plainer, cheaper form, from street stalls and market stalls as a quick breakfast or snack, usually with nothing more than the sweet soy sauce and a scattering of sesame seeds.
The starch blend is what separates silky from gluey
Rice flour alone makes a batter that sets too soft and tears easily when you try to roll it; it needs help from other starches to give the finished sheet enough structural integrity to be lifted, rolled and served without falling apart. Wheat starch — not the same thing as wheat flour, and worth seeking out specifically at a Chinese grocer, since it contains none of wheat flour’s gluten-forming proteins — adds a translucent, slightly chewy quality without introducing any of wheat flour’s toughness. Cornflour rounds out the blend, adding a touch more structure and a very slight glossy sheen to the finished sheet.
Getting this ratio right is the single biggest factor in whether your cheung fun turns out right. Too much rice flour relative to the starches and the sheet turns soft, floppy and prone to tearing the moment you try to roll it. Too much starch and the texture turns rubbery and bouncy in a way that reads as wrong even if you can’t immediately say why — cheung fun should be tender and yielding rather than springy. The ratio given here is a reliable starting point, but humidity, exact starch brands and even your steamer’s efficiency can shift the ideal balance slightly, so don’t be afraid to adjust the water very slightly on a second attempt if your first batch feels off.
Boiling water, added at the right moment
Whisking a portion of boiling water into the batter partway through mixing partially gelatinises the starches before the batter ever reaches the steamer, which is what gives the finished sheet its faintly translucent, glossy appearance rather than an opaque, flat white one. This step needs to happen gradually and with constant whisking — dumping the boiling water in all at once risks cooking pockets of the batter into lumps rather than gelatinising it evenly, and those lumps won’t smooth back out no matter how much you stir afterward. Straining the batter through a sieve after mixing catches any stray lumps that do form and is worth doing every time rather than treating it as an optional step for when things go wrong.
Let the batter rest for ten minutes before you start steaming, and stir it again immediately before ladling — the flour and starches settle quickly, and a batter ladled straight from the top of an unstirred bowl will be thinner and less consistent than one ladled from a properly remixed batch, giving you sheets of noticeably different thickness across a single session.
Steaming thin, working fast
The layer of batter on the tray should be thin — thin enough that you can just see the metal tray’s colour faintly through it before it steams, similar to how you’d judge a crepe batter in a pan. A thick layer takes longer to steam through evenly and produces a denser, less silky final texture; part of what makes good cheung fun special is exactly how thin and delicate the finished sheet is while still holding together as a rollable unit.
High, rolling steam heat matters more here than almost any other dim sum steaming job — a gentle simmer under the steamer basket will take too long to set the thin batter layer, during which time it can separate or cook unevenly. Three to four minutes over a proper rolling boil should be enough for a thin layer to set fully, turn translucent, and develop the very slight blistering on the surface that’s a good visual sign it’s properly cooked through.
Rolling has to happen while the sheet is still warm and pliable, within moments of coming out of the steamer. A sheet left to cool fully on the tray sets stiff and tears rather than rolling smoothly. Work quickly: loosen one edge with an oiled scraper, then roll the sheet up on itself into a tight cylinder in one continuous motion rather than several separate pushes, which tends to create uneven folds and thick spots.
The sauce is not an afterthought
Cheung fun’s sauce — a mix of light and dark soy, oyster sauce, a touch of sugar and a splash of water, gently simmered together and finished with sesame oil off the heat — is doing more work than a simple drizzle suggests. The sheets themselves carry almost no seasoning; all of the dish’s savoury, faintly sweet depth comes from this sauce, poured on generously rather than a token trickle. Restaurants that skimp on the sauce serve a noticeably blander plate, since the noodle itself was never designed to carry seasoning on its own. Simmering the sauce briefly rather than just mixing it cold helps meld the sugar and soy into a rounder, less sharp-edged flavour, and finishing with sesame oil off the heat, rather than cooking it in, preserves more of its aroma.
Fillings and variations
Plain cheung fun, unfilled and finished simply with sauce and sesame seeds, is the version sold most widely as a quick snack, and it’s a perfectly satisfying dish on its own. Restaurant dim sum versions frequently steam a filling directly into the sheet before rolling — sliced prawns, char siu pork, or beef are the most common, laid onto the batter partway through steaming so they cook into the sheet rather than sitting as a separate layer once rolled. If you want to try a filled version, lay thin strips of your chosen filling onto the batter about a minute into steaming, once it’s begun to set slightly, then continue steaming until fully cooked before rolling as normal.
Equipment and improvising without a proper tray
Dedicated cheung fun steaming trays — flat, rimmed, perforated metal sheets designed to sit inside a large steamer — make this dish considerably easier, giving you an even, consistently thin layer and enough rim to keep the batter from running off during steaming. Without one, a flat-bottomed metal pie dish, cake tin base, or even a large flat plate with a slight rim works, as long as it fits inside your steamer with a little clearance around the edges for steam to circulate. Avoid anything with a very deep rim, since a thick pool of batter defeats the whole purpose of the thin-sheet technique.
Oiling the tray properly between every single batch is not optional. Rice batter that’s set even slightly can grip stubbornly to bare metal, and a torn sheet at the lifting stage means starting that batch over rather than salvaging it — unlike a crepe, a torn cheung fun sheet can’t be patched back together once it’s out of the steamer. A light, even film of oil, wiped on with a folded paper towel rather than poured, gives the best release without leaving the finished sheet greasy.
Common failure points and how to read them
A sheet that tears the instant you try to lift an edge almost always means it came out of the steamer too soon — give it another 30 to 60 seconds next time and check for that faint blistering on the surface before assuming it’s done. A sheet that’s gone rubbery and bounces back when pressed usually means the starch ratio has tipped too far towards wheat starch or cornflour relative to rice flour; scale the rice flour back up slightly on your next batch. A cloudy, opaque sheet rather than a translucent one usually points to the boiling water step — either too little was used, or it wasn’t incorporated gradually enough to properly gelatinise the batter. None of these are difficult fixes once you know what you’re looking at, but they’re worth understanding rather than treating a bad batch as simply “this recipe doesn’t work,” since cheung fun genuinely does reward a second and third attempt as you calibrate your specific tray, steamer and stove to the process.
Cheung fun is very much a same-day dish. The sheets firm up and lose their signature silkiness within a few hours in the fridge, and reheating by steaming for a couple of minutes brings back some but not all of the original texture — worth doing if you must, but not something to plan around. Make it close to serving time rather than treating it as a make-ahead component of a larger meal.
For more Cantonese dim sum, see har gow prawn and chive dumplings and xiao long bao Shanghai soup dumplings. Lo mai gai sticky rice parcels in lotus leaf is the heartier dish that pairs well alongside this lighter, silkier one on the same trolley.
Related Content