Basque Burnt Cheesecake
Caramelised top, molten middle, no crust
Contents
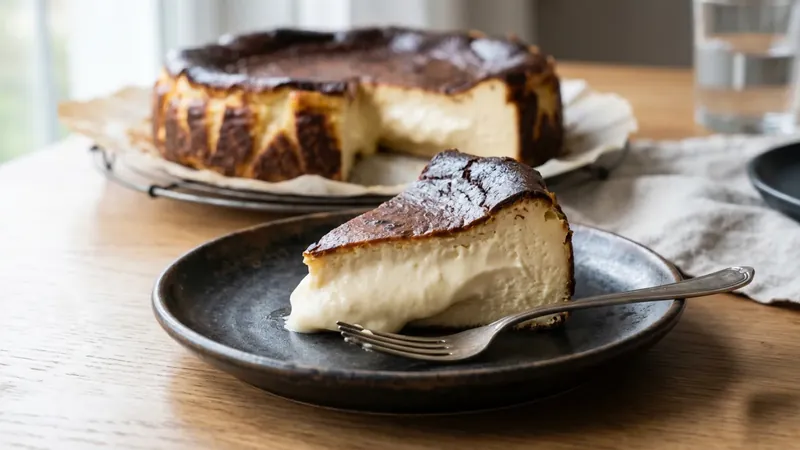
↓ Jump to recipeThis is the cheesecake that broke all the rules and won everyone over. No biscuit base, no water bath, no anxious checking for cracks; instead it is baked fierce and fast until the top scorches to a deep mahogany. The reward is a molten, almost custardy centre under a bittersweet, caramelised crown. It is genuinely one of the easiest impressive puddings going, and the one I reach for when I want something that looks like a lot of work and takes almost none.
Basque Burnt Cheesecake
Ingredients
- 900g full-fat cream cheese, at room temperature
- 300g caster sugar
- 5 large eggs
- 400ml double cream
- 1 tbsp plain flour
- 1 tsp vanilla extract
- 0.25 tsp fine salt
Method
- Heat the oven to 220C fan and line a deep 23cm springform tin with two overlapping sheets of baking paper, leaving the edges proud of the rim.
- Beat the room-temperature cream cheese with the sugar until completely smooth.
- Add the eggs one at a time, beating well after each, then beat in the salt and vanilla.
- Pour in the double cream and mix until silky, then sift over the flour and fold through.
- Pour the batter into the lined tin and tap it gently on the worktop to release air bubbles.
- Bake for 45 to 50 minutes until the top is deeply browned, almost burnt, and the centre still wobbles dramatically.
- Leave to cool in the tin to room temperature, where it will sink and set.
- Serve at room temperature or lightly chilled, peeling back the paper just before slicing.
The story
The burnt cheesecake has a single, well-documented birthplace: La Viña, a pintxos bar in the old town of San Sebastián, in the Basque Country of northern Spain. The bar was founded in 1959 by the Rivera family, and it was Santiago Rivera, working there in the late 1980s, who arrived at the version now copied everywhere. Trying to build a cheesecake that would hold its own alongside the counter’s savoury pintxos, he pushed the bake hotter and higher than convention allowed, lined the tins with scrunched parchment, and let the top scorch. He landed on the formula around 1988 to 1990, and for the best part of thirty years it stayed a local speciality, eaten by the slice by people passing through the bar and rarely discussed beyond it.
Its wider fame arrived late and fast. Food writers and chefs abroad seized on it in the late 2010s, drawn to its rule-breaking simplicity, and by 2019 it had become one of the most photographed desserts on the internet. The appeal is easy to understand once you have made a conventional cheesecake and worried it through the oven door. Where a New York cheesecake is coddled in a water bath at a low temperature to keep it pale and crack-free, the Basque version is pushed into fierce heat and actively encouraged to colour, blister and crack. Those flaws are the whole point, which is exactly why a nervous baker relaxes the moment they understand the brief.
There is real chemistry behind the theatrics. High heat drives two things at once. At the surface, the sugars caramelise and the proteins brown through the Maillard reaction, producing the bitter, almost toffee note that stops the whole thing tasting flatly sweet and balances the richness beneath. Deeper in the cake, the centre never fully sets, staying loose and creamy because it is pulled from the oven while still wobbling; the residual heat trapped in the mass finishes the job as it cools, firming the edges while the middle settles into something between a baked custard and a soft cheese. If you overbake it, you lose that gradient entirely and end up with a uniform, sliceable cake that is perfectly nice but misses the point. Trust the wobble.
The short ingredient list rewards good basics and punishes shortcuts. Full-fat cream cheese and double cream give the body, and there is nothing to hide behind, so this is not the place for a low-fat tub. A single tablespoon of flour is just enough to steady the structure without making it dense. The one non-negotiable is temperature: cream cheese straight from the fridge beats into a lumpy batter that never quite smooths out, and those lumps set into the finished cake, so give it a full hour or two on the counter first. If you are chasing that clean-custard interior, this shares its logic with a crème brûlée, where gentle handling and a hot finish do the work; if you would rather a no-fuss make-ahead, the assembly discipline is the same one that makes an orange tiramisu sing.
Getting the bake right
The oven does almost all the work here, so it pays to understand what it is doing. A conventional cheesecake is coaxed to set at a low, even temperature, often in a water bath, precisely to avoid the browning and cracking that the Basque style courts on purpose. Here you want the opposite: a genuinely hot oven, 220C fan, so the top colours fast while the interior is still catching up. That gap between a scorched surface and a barely set centre is the entire character of the cake, and it only happens if the heat is fierce enough to brown the top before the middle has time to firm.
Position matters. Bake the tin on a shelf in the upper third of the oven, where the top is closest to the element and colours most readily, and resist the urge to open the door for the first forty minutes, since a blast of cool air will slow the browning and can cause the rise to stall. Ovens vary, and this is a bake you read by eye rather than by the clock: you are looking for a deep, even mahogany, darker than you would ever normally take a cake, with a centre that still shudders like a soft jelly when you nudge the tin. If your oven browns unevenly, turn the tin once at around the thirty-five minute mark. If the top is racing ahead of the centre and threatening to burn outright, lay a sheet of foil loosely over the surface for the last ten minutes. The deep 23cm tin gives the batter enough height that the middle stays molten while the edges set, which is the gradient you are chasing.
What goes wrong, and how to avoid it
The most common failure is a batter full of tiny air bubbles that bake into a domed, spongy top rather than a dense, silken one. Beat the cream cheese and sugar only until smooth, add the eggs one at a time on a low speed, and resist the urge to whip air in; then tap the filled tin firmly on the worktop several times to knock out trapped air before it goes in the oven. The second is pulling it too late. The centre should still shudder like a soft-set jelly when you nudge the tin at 45 minutes; if it looks completely set, it is already overdone. The third is impatience at the end. It needs to cool fully in the tin, where it sinks and firms; slice it warm and it will collapse into a puddle.
Substitutions and variations
Swap 100g of the caster sugar for soft light brown sugar to deepen the caramel note, or fold the finely grated zest of a lemon through the batter for a cleaner, brighter finish. A tablespoon of good cocoa sifted in with the flour turns it faintly chocolatey without dulling the burnt top. For a savoury-edged, grown-up version, add 50g of crumbled blue cheese to the batter, which plays beautifully against the bitter crust. If you want it looser and more molten, drop the bake to 40 minutes; if you prefer it sliceable and firm, take it to 55.
Storage and make-ahead
This is a genuine make-ahead dessert and arguably better for it. Bake it a day in advance, cool completely, then cover and chill overnight; the flavour rounds out and the texture sets to a firmer, more sliceable crumb. Bring it back to room temperature for an hour before serving if you want the molten middle, or serve it straight from the fridge for a denser slice. It keeps, covered, for up to four days in the fridge, and freezes well: wrap individual slices and defrost overnight in the fridge. The scrunched paper that lines the tin leaves the sides ruffled and rustic, so there is no need for neat edges, which makes this an unusually forgiving thing to bake for a crowd. Cut it with a warm, dry knife, wiping the blade between slices, and it will give you clean wedges without dragging the soft centre.
Related Content